Which primer to use? ***** Kateri primer je pravi zame?

Last week, I wrote an extensive post about my pre-foundation skincare routine and mentioned a few primers that help me set up a good base for the rest of my make-up. Since I often get asked about what primer I consider the best (and since I haven’t written a long post about my primers since 2015), I though this would be a good opportunity to show you what I’m currently using.

Prejšnji teden sem napisala dolgo objavo o moji rutini pred nanosom tekoče podlage in že v njej omenila nekaj primerjev, ki mi pomagajo pripraviti kožo za nanos podlage. Ker me bralke pogosto sprašujete, kateri primer se mi zdi najboljši (in tudi ker bolj odločno o temi primerjev nisem pisala že vse od leta 2015), bom to priložnost izkoristila, da ti predstavim primerje, ki jih trenutno uporabljam.

My skin is normal with dry zones, some enlarged pores on my T-zone and some redness around my nose and between my eyebrows. I choose primers according to my problems  – and you should do the same. Please, take a look at the pre-foundation routine post  for more information on that since I don’t want to repeat myself. Remember – different primers work in different ways so you need to choose yours carefully – do you need filling of the pores, blurring of wrinkles, some color correcting or simply want your make-up to last longer?

Moja koža je normalna z nekaj suhimi točkami, povečanimi porami na T-zoni in z nekaj rdečice okrog nosu in med obrvmi. Primerje tako izbiram glede na težave svoje kože, enako pa priporočam tudi tebi. Prosim, preberi si mojo objavo o rutini pred nanosom tekoče podlage (najdeš jo *tu*), saj je že v njej zapisanih kar nekaj pomembnih informacij, ki jih danes ne bi ponavljala. Različni primerji delujejo na različne načine – ali potrebuješ zapolniti pore, zabrisati gubice, popraviti kakšno barvno nepravilnost ali želiš le, da bi tvoja tekoča podlaga na obrazu ostala lepa dlje časa?

Generally speaking in terms of your skin type – if your skin is dry, it will probably handle silicone primers well. Silicones will help you get a more even application of the liquid foundation and prevent caking in the dry areas. You should stay away from mattifying primers which will only make the situation worse. On the other hand, silicone based primers don’t perform well on oily skin since they tend to slide around and will not help your make-up stay on longer. With oily skin, you’re better off with a mattifying prime that will blur out the imperfections and help your make-up stay on longer. This is the general rule of thumb. There are so many primers in the market (with and without SPF, mattifying, color correcting,  illuminating, …) that you’ll surely find the one that will be perfect for your skin.

Če govoriva povsem na splošno, potem za izbiro primerja veljajo določene zakonitosti. Če imaš suho kožo, bodo verjetno za tebe bolje delovali silikonski primerji. Te ti bodo pomagali ustvariti lepo osnovo za nanos tekoče podlage in bodo tej preprečili, da bi se nabirala na bolj suhih delih tvojega obraza. Izogibaj se matirnih primerjev, ki bodo tvoje težave s suho kožo še poudarili. Po drugi strani silikonski primerji po navadi niso najboljši za mastno kožo, saj drsijo po obrazu in bo tekoča podlaga drsela skupaj z njimi. Če imaš mastno kožo, bi ti priporočala, da izbereš matirni primer, ki bo prav tako zabrisal nepravilnosti in poskrbel za daljšo obstojnost tekoče podlage. Vendar pa so to le splošna pravila – na trgu je toliko primerjev (z in brez SPF, matirni, z barvnimi korekcijami, osvetljevalni, …), da boš gotovo našla tistega, ki je najboljši za tvojo kožo.

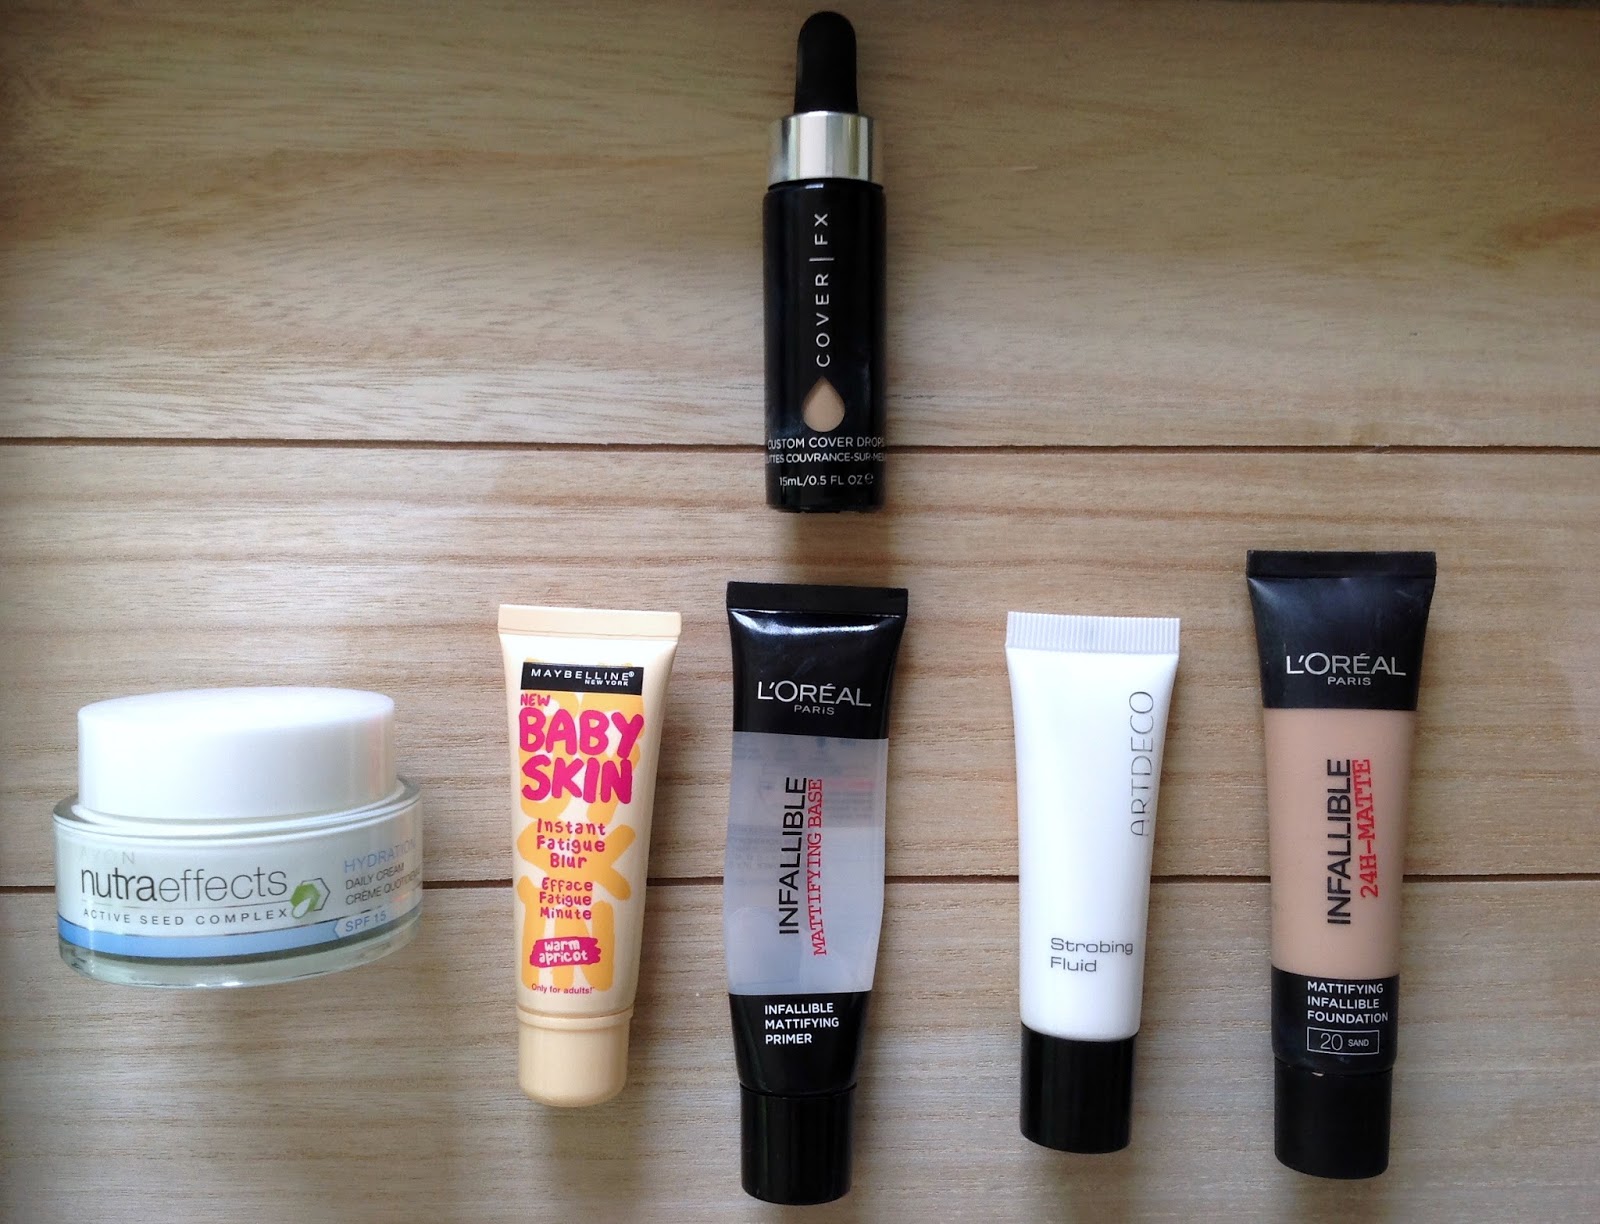
Let’s start off with the newest addition to the family, the Mark Magix Face Primer from the new Avon Mark line. This is a good silicone based primer that will help you if you want to blur out imperfections on your skin and prepare it for liquid foundation. I like that it has no harsh smell and it absorbs very quickly. The texture is a bit funny, but once you get used to it, it’s not a problem. Negatives: I didn’t feel like it helped my make-up stay on longer which is true for most silicone primers, at least in my case. It also didn’t do enough  to fill in the largest pores which were still slightly visible after use. Available from Avon salesforce. 3/5.

Začniva z najnovejšim članom moje družine primerjev, Mark Magix Face Primerjem iz nove Avon Mark linije. Gre za dober silikonski primer, ki bo zabrisal nepravilnosti in kožo dobro pripravil za tekočo podlago. Všeč mi je, da nima močnega vonja in se zelo hitro vpije v kožo. Sama tekstura tekočine je nekoliko drugačna kot pri večini primerjev, ampak se nanjo ni težko navaditi. Pomanjkljivost: zdi se mi, da ni podaljšal obstojnosti za mojo tekočo podlago, kar pa pri meni velja za večino silikonskih primerjev. Prav tako bi si želela videti večji učinek na moje pore, ki so bile po nanosu še vidne. Dostopen pri prodajalcih Avon. 3/5.

The second primer I’m currently using is the e.l.f. Poreless Face Primer. e.l.f. carries quite a few different primers and I’ve tried most of them. I like the texture which is silky smooth (again, this is a silicone based primer). For me, it evens out my complexion beautifully and really fills in my pores. It’s also the least expensive out of the bunch. Unfortunately, this is one of the foulest smelling beauty products I’ve ever come across which is why it’s hard for to to reach for it in the morning. Available from iHerb. 2/5.

Naslednji primer, ki ga trenutno uporabljam, je e.l.f. Poreless Face Primer. Znamka e.l.f. ima v svoji ponudbi kar nekaj primerjev, od katerih sem jih preizkusila že večino. Pri tem primerju mi je všeč tekstura (tudi tu gre za silikonski primer). Mojo kožo lepo poenoti in dobro zapolni moje pore. Je tudi najcenejši od vseh, ki ti jih predstavljam danes. Na žalost pa gre za enega najbolj smrdečih izdelkov, ki sem jih kadar koli preizkušala, zato se moram prav prisiliti, da ga zjutraj potegnem iz predala. Dostopen preko iHerb. 2/5.

Next I want to talk about the L’Oreal Infallible mattifying base. I fell in love with this in the spring but completely stopped using it in the summer because in the heat, my foundation was slipping off even without a silicone primer underneath. Lately, I started using it again in situations when I need my foundation to look great for the evening. In colder months, it lasts reasonably long and gives a semi-matte effect but doesn’t accentuate my dry spots. I would stay away if you have very dry skin, but other then that it would probably work fine for you. Available in drugstores (DM, Muller etc.). 4/5

Naslednji v moji zbirki je L’Oreal Infallible mattifying base. V ta primer sem se zaljubila spomladi, vendar pa ga praktično celo poletje v toplem vremenu nisem uporabljala, saj je tekoča podlaga že brez silikonskega primerja drsela okrog po mojem obrazu in je primer vse skupaj le še poslabšal. V hladnejših mesecih sem ga uporabljala predvsem takrat, ko sem želela, da moja podlaga krajše obdobje izgleda čudovito. Primer kožo delno matira, pri čemer ne poudari mojih suhih predelov. Ta primer ti odsvetujem, če imaš zelo suho kožo, v vseh nasprotnih primerih pa bo verjetno zate delal ok. Dostopen v drogerijah (DM, Muller itd.). 4/5

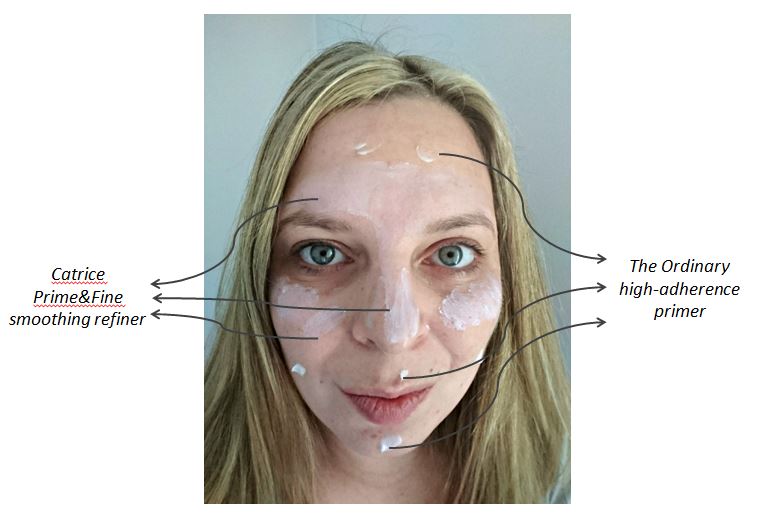
I already talked about The Ordinary High-Adherence Silicone Primer *here*. In short, it’s a primer with a great price that will give your skin a smoother look but it will not cover any major imperfections or help your foundation last longer. Available from Deciem online store. 3/5

O The Ordinary High-Adhererence Silicone primerju sem že pisala *tu*. Na kratko – gre za ugoden primer, ki bo dal tvoji koži svilen videz, vendar pa ne bo zabrisal kakšnih večjih nepravilnosti ali pomagal k večji obstojnosti tvoje podlage. Dostopen preko Deciem spletne trgovine. 3/5

Last one of the bunch is the Etude House Baby Choux base in the shade Mint choux. It’s a color correcting primer which helps me reduce the redness I talked about previously. I like it in the summer months because it gives my skin a mattified effect so that I’m not shining like a lighthouse before lunchtime. It also boasts a SPF of 30 which is enough that you can get away without applying extra layer of protection. Negatives: it has a dry texture so it’s a bit more difficult to spread evenly across the face. But don’t worry about looking green in the face – once applied, it will turn into a while formula. Available from online stores that carry Korean cosmetics, such as Jolse. 4/5.

Zadnji primer, ki ga trenutno testiram in uporabljam, je Etude House Baby Choux Base v odtenku Mint Choux. Gre za primer, ki se osredotoča na barvno korekcijo in mi pomaga pri prekrivanju rdečice, ki sem jo omenila prej. Z veseljem ga uporabljam predvsem v poletnih mesecih, saj mojo kožo matira in mi pomaga, da se že pred časom kosila ne svetim kot svetilnik. Formula se ponaša tudi z SPF 30, kar je po mojem mnenju zadostna zaščita, da ne potrebujem še dodatnega sloja kreme za sončenje. Njegova največja pomanjkljivost je suha formula, zaradi česar je enakomeren nanos precej težak. Naj te zelena barva ne skrbi – v obraz ne boš zelena, saj se ob nanosu na rdečico primer obarva belo. Dostopen preko spletnih trgovin, ki ponujajo korejsko kozmetiko, kot na primer Jolse. 4/5

If you want to look for good alternatives in our drugstores, I’d suggest looking to the brands Catrice, L.O.V. and Bourjois which normally have a large array of primers for every skin type. Hopefully, this was useful – but if you have any additional questions, I’m here for you! Until next time, stay beautiful!

Če želiš dobro alternativo omenjenim primerjem poiskati v naših drogerijah, ti predlagam, da si ogledaš ponudbo znamk Catrice, L.O.V in Bourjois, ki imajo po navadi na voljo širok nabor primerjev z različnimi funkcijami, ki pomagajo različnim tipom kože. Upam, da ti bo moja objava pomagala pri izbiri, v kolikor pa imaš še kakšno vprašanje, ti z veseljem pomagam! Do naslednjič, ostani čudovita!


Pre-foundation routine ***** Koraki pred nanosom tekoče podlage

I am really happy with the recent shift in the beauty circles – we stopped talking about high-coverage foundations and heavy make-up and started talking about how to best achieve natural and healthy looking skin. This naturally means that our skin needs a bit more TLC in order to still look good without caking on the foundation. Lately, I’ve been enjoying light coverage foundations and I must say that I am over the matte trend. I want my skin to look fresh and natural. Since I often get asked how I achieve this, I’d like to introduce you to my steps before applying liquid foundation.

Veseli me, da se v zadnjem času v lepotnih krogih pogovor premika od tega, katera tekoča podlaga ima najboljšo prekrivnost in od želje po težkem ličenju k temu, da si želimo naravnega in zdravega videza kože. Seveda to pomeni, da je potrebno za kožo skrbeti, saj le tako lahko z manjšo prekrivnostjo dosežemo super rezultat. Sama se zadnje čase nagibam k podlagam z lahko prekrivnostjo in priznati moram, da me je tudi mat trend minil – želim, da moja koža izgleda naravno in sveže. Ker me pogosto sprašujete, kako to dosežem, vam danes predstavljam moje korake pred nanosom tekoče podlage.

Everything starts with a morning cleanse which includes a liquid gel cleanser (like Mirati, review *here*), a toner (like Bocassy, review *here*) and hialuronic gel. Now, my skin is ready to start with the pre-foundation routine. First, I need to moisturize my skin really well so I use three different products. First is the Melvita damaske rose floral water which I spray on my face a couple of times. Besides the lovely smell that really wakes me up in the morning, this is the first step of hydration. I follow up with some sun protection – at the moment, I’m finishing up the Avon moisturizing face cream with SPF 30. Protection against the sun is necessary all year long, not only in the summer months so it’s necessary that you include a product with a high SPF factor (in my opinion, factor 10 from many liquid foundation formulations just doesn’t cut it). Since I feel that Avon cream is somewhat lacking in the moisturizing bit, I end up the first step with the Yves Rocher Derma Care daily moisturizer which is also appropriate for sensitive skin. I give special attention to the under-eye area which prevents my concealer from caking later on. I give my skin a few minutes to soak everything in while I finish up getting dressed and style my hair.

Seveda se vse začne z jutranjim čiščenjem, ki ga opravim s kakšnim tekočim gelom (na primer Mirati, oceno si lahko prebereš *tu*), po tem pa nanesem tonik (na primer Bocassy, ocena *tu*) ter hialuronski gel. Sedaj je koža pripravljena, da lahko začnem rutino pred nanosom tekoče podlage. Prvi korak je vlaženje, ki ga opravim v treh fazah – začnem z Melvita cvetno vodico iz organske vrtnice, ki jo nekajkrat popršim po celem obrazu. Poleg super dišečega vonja, ki me še malo prebudi, je to prva faza vlaženja kože. Nadaljujem z zaščito pred soncem – trenutno je to Avonova vlažilna krema z SPF 30. Zaščita kože je nujna skozi celo leto, ne samo v poletnih mesecih, zato je potrebno v rutino vključiti vsaj en izdelek z dobrim SPF faktorjem (po mojem mnenju je faktor 10, s katerim se ponaša večina tekočih podlag, absolutno premalo). Ker se mi zdi Avonova vlažilna krema premalo hidratantna, na koncu nanesem še Yves Rocher Derma Care dnevno hranilno kremo, ki je primerna tudi za občutljivo kožo. Še posebej dobro navlažim tudi predel okrog oči, kar prepreči gubanje korektorja, ki ga bom nanesla kasneje. Nato koži privoščim nekaj minut, da vse vsrka vase, medtem pa se običajno do konca oblečem in uredim lase.

I want to emphasize that all of the following steps work on my skin which is well hydrated but I do struggle with some dry areas and some redness. I apply my products very precisely so I can target the problem areas and not put too many layers on my skin which would consequently make my foundation slide around. You need to take a good look at your skin, find your problems and then apply this particular routine to your face as you see fit. As you can see from the photo (which is not photoshopped at all, but I reduced the level of brightness so you can see my problems even better – a small applause is appreciated), the difference my routine makes is really noticeable.

Poudarila bi, da so vsi naslednji koraki prilagojeni moji koži, ki je sicer kar dobro navlažena, imam pa nekaj suhih predelov in nekaj rdečice. Zato zelo natančno nanašam izdelke, ki se bojujejo proti mojim težavam, saj ne želim preveč plasti na svojem obrazu, ker bi tudi tekoča podlaga posledično drsela naokrog in zdržala veliko manj časa. Sama zase moraš torej razmisliti in si ogledati svojo kožo, da boš lahko rutino, ki ti jo predstavljam, najbolje prenesla v svoj vsakdan. Kot lahko vidiš s fotografije (ki je nisem nič popravljala, samo zmanjšala sem svetlobo, da lahko še bolje vidiš nepravilnosti – prosim za majhen aplavz za pogum), je razlika pred in po rutini res opazna.

I start by covering my enlarged pores and creating a smooth canvas which will make foundation application much easier. I target my pores with Catrice Prime and Fine Smoothing refiner which fills up and blurs my pores. I apply The Ordinary High-adherence silicone primer to the rest of my face. This makes my skin much more smooth – read the whole review *here*.

Začnem s prekrivanjem razširjenih por in ustvarjanjem gladke podlage, ki mi kasneje omogoči lep nanos tekoče podlage. Na področja, kjer imam razširjene pore, nanesem Catrice Prime and Fine Smoothing refiner, ki moje pore zapolni in jih lepo zabriše. Na preostanek obraza, kjer težav s porami, nanesem The Ordinary High-adherence silikonski primer, ki s tanko plastjo ustvari gladko in nežno kožo – celotno oceno si lahko prebereš *tu*.

Last two steps are intended for covering up the last imperfections and making sure that my skin looks healthy and glowing. I use Etude House Baby Choux base – Mint Choux primer to neutralize the redness between my eyebrows, around my nose and on the chin. Mint Choux has a green tint to it so it neutralizes the red undertone, but you can choose the color that will help your particular imperfections. There are many color correctiong products on the market right now. Last but not least, I apply Artdeco Strobing Fluid to the areas where I want to add some natural glow to the skin – on my cheekbones, above my eyebrows and on the bridge of the nose. It took me some time to figure out how best to use the strobing fluid. It’s not a highlighter since it doesn’t contain any shimmery pigment, but only gives a subtle, barely noticeable glow to the skin.

Ostaneta le še zadnja dva koraka, v katerih prekrivam zadnje nepravilnosti in tudi že poskrbim, da bo moja koža res svetleča in zdrava. Z Etude House Baby Choux Base – Mint Choux primerjem nevtraliziram rdečico, ki se mi pojavi med obrvmi, okrog nosu in na bradi. Mint Choux je zelene barve, zato dobro nevtralizira rdeče podtone, seveda pa se lahko glede na svoje težave odločiš tudi za drugo barvo. Tudi na slovenskem trgu je sedaj takšnih izdelkov že zelo veliko. Nazadnje Artdeco Strobing Fluid nanesem na področja, kjer želim svoji koži dodati nekaj naravnega sijaja – na ličnice, nad obrvi ter vzdolž nosu. Potrebovala sem kar nekaj časa, da sem ugotovila, kako ta strobing fluid najbolje deluje zame – ne gre namreč za osvetljevalec, saj ne vsebuje svetlečih pigmentov, ampak samo za nežno žarečo tekočino, ki je na koži komaj opazna.

The entire routine takes up between 5 to 10 minutes, largely depending on how much time I can afford to the moisturizers from step one to really soak into the skin. Every single fundation I have tried works better on a skin that is well prepped, it applies easier and more evenly, doesn’t stick to dry patches, doesn’t slide off the face and doesn’t look unnatural. You will achieve the best result by using fresh, light foundations – the results won’t be as good with matte formula. Recently, I’ve been loving the Rimmel Fresher Skin liquid foundation – for a whole review, head over to Simona to Beauty of a Lemon blog where you can see that particular product in detail.

Celotna rutina mi vzame med 5 in 10 minut, odvisno predvsem od tega, koliko časa lahko namenim vlažilcem iz prvega dela, da se dobro vpijejo v kožo. Prav vsaka tekoča podlaga, ki sem jo preizkusila, se na tako pripravljeni koži obnaša lepše, saj se nanese lažje in bolj enakomerno, ne oprime se suhih predelov, ne zdrsi z obraza in ne izgleda nenaravno. Seveda boš najboljši učinek dosegla z lažjimi, svežimi podlagami – z mat podlago rezultat ne bo tako dober. Zadnje čase sama veliko uporabljam Rimmel Fresher Skin tekočo podlago – za oceno te pošiljam k Simoni na blog Beauty of a Lemon, kjer si lahko delovanje podlage ogledaš bolj natančno.

I hope that this post will help you in putting together a routine that will work for your skin and help you achieve the look you want. I’d love to hear your opinion about it! Until next time, stay beautiful!

Upam, da sem ti s tem zapisom pomagala in boš lažje sama sestavila rutino, ki bo ustrezala tvoji koži in ti podarila videz, kot si ga želiš. Z veseljem bi slišala tvoje mnenje! Do naslednjič, ostani čudovita!

Bell Hypoallergenic – review & swatches

A while ago I attended an event hosted by Bell Cosmetics in order to show us some new goodies that were released in the past few months. In the end, I got to choose three products to take home with me and today, I want to share my thoughts and opinions with you. Bell Cosmetics are different because they are formulated with the assistance of dermatologists and ophthalmologists, meaning they are also appropriate for people with sensitive skin and eyes. None of their products are tested on animals.

I also want to take this opportunity to say the following: yes, the products in the photos are used. I don’t see the point in taking photos of brand new products – I want you to see that I really use these products, how they look like when they’re used and that I am giving you my honest user opinion. With that being said, let’s jump straight into it.

Pred nekaj meseci sem se udeležila dogodka Bell Hypoallergenic, na katerem so slovenskim lepotnim blogerkam predstavili nove izdelke, ki so na trg prišli v zadnjem času. Na koncu dogodka sem si lahko izbrala tri izdelke, danes pa želim s tabo deliti svoje mnenje o njih. Bell Cosmetics je kar posebna znamka, saj so formule dekorativne kozmetike razvite v sodelovanju z dermatologi in oftamologi, kar pomeni, da so primerni tudi za ljudi z občutljivo kožo in očmi. Izdelki niso testirani na živalih.

To priložnost bom izkoristila tudi za naslednje pojasnilo: ja, izdelki na fotografijah so bili uporabljani. Ne vidim razloga, da bi fotografirala popolnoma lepe, nove izdelke – želim, da vidiš, da jih uporabljam, kako izdelki izgledajo, ko so že uporabljani in da lahko na podlagi tega lažje razumeš mojo uporabniško izkušnjo. Tako, zdaj pa lahko začneva z oceno.

First, a few words about the Mat&Soft foundation (9,90€, shade 01 – light beige). It comes in a bottle with a pump which I appreciate because I don’t like touching the product in the packaging. I need two pumps for my entire face. The formulation certainly gives you a mat finish. At first, I was a bit disappointed in the coverage (which is quite light), but I quickly learned that it can be easily built up to medium coverage. If I’m going for a matte finish, I also pack on the mat powder after foundation, so the skin ends up looking flawless. I think that it wouldn’t work great for very dry skin, but other than that – if you’re looking for a light matte foundation, I would say try this one out. Downside: it only comes in three different shades.

Najprej nekaj besed o Mat&Soft tekoči podlagi (9,90€, odtenek 01 – light beige). Všeč mi je steklenička s pumpico, saj se ne maram dotikati produkta, dokler je v embalaži. Za svoj obraz porabim dve pumpici izdelka. Podlaga obljublja mat zaključek in to obljubo tudi izpolni. Na začetku sem bila nekoliko razočarana nad rahlo prekrivnostjo, vendar pa sem hitro ugotovila, da se lahko prekrivnost nadgradi z več sloji. Če želim popoln mat zaključek, na podlago nanesem še mat puder, po čemer koža izgleda čudovito. Mislim, da ta tekoča podlaga ni najbolj primerna za suho kožo, sicer pa bi ti jo priporočila, v kolikor iščeš mat podlago z lahno do srednjo prekrivnostjo. Minus? Dosegljiva je le v treh različnih odtenkih. View Post

Cover FX Custom Cover Drops


Now my only question about this product is: why didn’t anyone think of this sooner?


First, let’s do the technical part of this amazing product. It contains Flash Fusion Technology meaning that when you mix it with something, it transforms into pure pigment. It is formulated without parabens, sulfates and phthalates.


Now, let’s get down to business. As said, this stuff is pure pigment. You can mix it with just about anything depending on what you want the finish to look like. So far, I tried to blend it with a moisturizer, a silicone based primer, an ordinary primer, a strobing fluid and another lightweight foundation. You can check out the results below (all with three drops). If you want a glowing, dewy skin, go for the moisturizer or even some face oil. If you want a more matte finish, try using a mattifying primer or a lightweight mattifying foundation. It’s really all up to you.


About the number of drops – three is the most you need, really. One drop for light coverage, two for medium coverage, three for full coverage and four for total coverage, as shown below mixed with a primer. The thing is – if you add more than four drops, the consistency and coverage won’t change dramatically so you might as well save the product. And even if you go for total coverage, you’ll barely know there’s anything on your face, because if mixed with a light medium these drops are completely lightweight!


The bottle itself is minimalist and I like you can see the color in the drop below so you can compare it to your skin in the store if need be. The dropper is fantastic and the number of drops is very easy to control. Of course, things will probably get a bit messier when I get to the end of the product, but that is to be expected with all droppers.


The 15 ml bottle costs 44 $ in Sephora or 39 € on Beauty Bay. Yes, it’s not cheap. But I’ll tell you this – if I wasn’t a beauty blogger and thus in need of trying new foundations in the market, I seriously doubt I would ever buy a foundation again. Ever. I would get one shade of FX drops for summer and one for winter and that would be it. I will also totally be able to transform some of the foundations that I didn’t like so much into something wearable.


All in all, this will probably become a staple in my make-up collection. I’ve been using it non-stop for the past few weeks and I’m still discovering new ways to use it which amazes and excites me a lot.


Until next time, stay beautiful!

View Post

Sephora (and MAC) haul

I know that some of you take offense when I’m writing about things that are not easy/next to impossible to get in Slovenia (or, to be honest, in Europe), but still I got some positive feedback from others, saying that you like such posts, since they make you either have them shipped/buy them on your travels/order them from friends that are traveling etc.

Well, I do realize that writing about products that you cannot just go out and buy isn’t exactly productive, but just keep in mind this one thing – if you dream it, you dreams can come true. And please, don’t only apply it to make-up shopping 🙂

Anyway, my Sephora basket wasn’t as extensive as it was about a year ago, but my wishes have gotten much, much more specific.

First of all, I was on the hunt for a full coverage foundation. This Kat Von D Lock it tattoo foundation does seem dark for me in the bottle (shade 54 – medium), but for some reason it’s the perfect shade – if I were to buy it over the internet, I would go much lighter and completely miss the target.

I literally just need one tiny pump of this foundation to cover my entire face, and boy oh boy, does it cover every single thing. I wouldn’t say this is an everyday foundation for me, but it’s great for when I will need my complexion to look fabulous. I would not wear this every day since it does feel quite heavy and I have a feeling that it does crawl deep into my skin and settles there. It cost 35 $ at Sephora.

 Next is an absolute must and a palette that has probably been review by every beauty blogger (and their mother) on this planet, but as always, I’m late for the party. It’s the Anastasia Contour palette (mine is in light to medium). View Post